Auntie's Cherished Coconut Cake: A Legacy of Moist, Yellow Perfection
There are some recipes that transcend mere ingredients and become heirlooms, weaving themselves into the fabric of family traditions and cherished memories. For many, that recipe is a classic
coconut layer cake. Imagine the scene: a festive table laden with holiday treats, and at its heart, a towering, pristine white cake, its delicate scent of coconut mingling with the aroma of home. This isn't just any dessert; it's Auntie's Cherished Coconut Cake – a recipe passed down through generations, celebrated for its exquisite moist yellow crumb, perfect balance of sweetness, and an undeniable touch of nostalgic magic.
Inspired by the heartfelt traditions of beloved family bakers, this article dives deep into the art of creating a truly unforgettable
coconut layer cake. Forget the dry, crumbly imposters; we're talking about a showstopper that consistently delivers on flavor, texture, and presentation. Whether it's the centerpiece of your Christmas feast, a refreshing addition to your Easter brunch, or a year-round celebration of all things delicious, mastering this cake will earn you a reputation as a baking virtuoso.
The Anatomy of an Irresistible Coconut Layer Cake: Yellow, Moist, & Perfectly Sweet
What makes Auntie’s
coconut layer cake so exceptionally cherished? It's a symphony of perfectly balanced elements that come together to create a harmonious and deeply satisfying dessert.
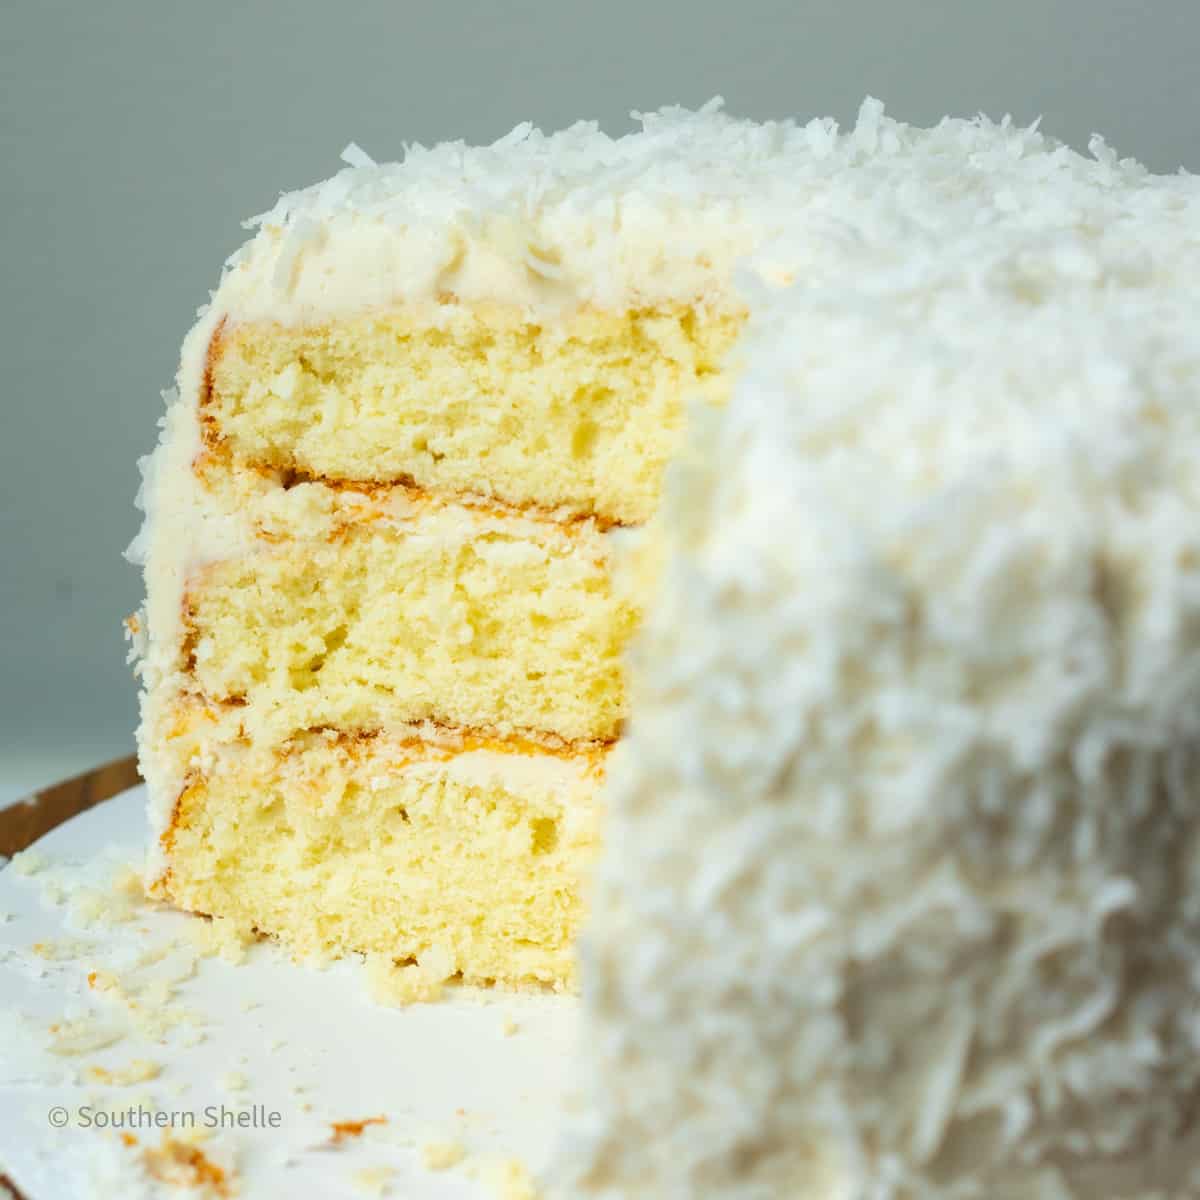
A Foundation of Moist Yellow Cake
Unlike some coconut cakes that rely on a white or vanilla base, Auntie's recipe calls for a true yellow cake. This isn't arbitrary; the subtle richness and golden hue of a yellow cake provide the perfect canvas for the delicate coconut flavor. The goal is a cake that is incredibly moist, almost melting in your mouth, yet sturdy enough to form beautiful, stacked layers. Achieving this balance is crucial, preventing the common pitfall of a dry, uninspiring cake. The moistness comes not just from careful ingredient ratios but also from specific baking techniques that we'll explore shortly.
Subtle, Unforgettable Coconut Infusion
The beauty of this cake lies in its thoughtful integration of coconut, ensuring it's present and flavorful without being overwhelming. The secret? Coconut is woven into both the cake batter and the frosting. Fine shredded coconut is gently folded into the moist yellow cake, providing bursts of texture and flavor within each bite. For the crowning glory, the buttercream is crafted with coconut milk, imbuing it with a natural, creamy coconut essence that's far superior to artificial extracts. This dual approach ensures a rich, authentic coconut experience that doesn't overpower the palate.
The "Not Too Sweet" Promise
One of the most praised attributes of this particular recipe is its perfectly balanced sweetness. Many homemade cakes can err on the side of being overly sugary, masking the nuanced flavors of their core ingredients. Auntie's Cherished Coconut Cake, however, strikes an ideal equilibrium. The sweetness is just enough to be delightful, allowing the natural richness of the yellow cake and the fragrant notes of coconut to truly shine through. This makes it a dessert that can be savored without feeling heavy, inviting you back for another slice.
Unlocking the Secrets to an Unforgettable Texture: Tips for Moist & Fluffy Layers
Creating a perfect
coconut layer cake that’s consistently moist and fluffy requires attention to detail and a few key techniques. These aren't just steps; they're commitments to culinary excellence.
The Golden Rule of Room Temperature Ingredients
This is non-negotiable. For a truly light and airy cake, butter, eggs, and milk *must* be at room temperature. Ideally, set them out at least an hour before you plan to bake. Why? Room temperature ingredients emulsify better, creating a smoother, more uniform batter. This leads to better aeration during the creaming process, resulting in a finer crumb and a more tender cake. Cold ingredients, on the other hand, can cause the batter to curdle and affect the final texture.
Mastering the Bake: Low and Slow
Preheating your oven accurately is paramount. For this delicate cake, a slightly lower temperature of 325°F is recommended. Baking at a gentle heat allows the cake to rise gradually and evenly without drying out the edges prematurely. This slow bake promotes a uniformly moist interior. For 8-inch cake pans, expect a bake time of 35-37 minutes. If you're using 9-inch rounds, start checking for doneness around the 28-minute mark. A skewer inserted into the center should come out clean.
The Art of "Mise en Place" for Baking Success
French for "everything in its place," mise en place is a baker's best friend. Before you even turn on your mixer, measure out *all* your ingredients and arrange them in the order you'll need them. Yes, this means a few more dishes, but it allows you to focus solely on technique during the active baking process, reducing errors and ensuring a smoother workflow. A pro tip: measure your flour first, then immediately add your "baking trinity" (salt, baking soda, baking powder) directly to the flour. This ensures even distribution of leavening agents.
Perfect Pan Preparation
To guarantee your beautiful cake layers release effortlessly, proper pan preparation is key. Cut rounds of parchment paper to precisely fit the bottom of your cake pans. Then, generously spray the pans with cooking spray, placing the parchment rounds on top. This creates a non-stick barrier that practically ensures your cakes will slide out perfectly, preventing heartbreaking sticking.
The Creaming Method: Building a Tender Crumb
In the bowl of your stand mixer (or using an electric mixer), cream the softened butter and granulated sugar together until they are light and fluffy. This vital step incorporates air into the mixture, which is crucial for a tender cake texture. Don't rush this; it should take several minutes. Next, add vegetable oil. This addition is a game-changer, contributing significantly to the cake's exceptional moistness and keeping it fresh for longer.
After that, incorporate the egg yolks one at a time, mixing well after each addition to ensure full emulsification and a smooth batter. Finally, stir in the vanilla extract, which rounds out the flavor profile beautifully. For a deeper dive into preventing dry layers and achieving ultimate fluffiness, you might find valuable insights in
Bake a Perfect Moist & Fluffy Coconut Layer Cake: No Dry Layers.
Crafting the Signature Coconut Buttercream: A Cloud of Flavor
While the cake layers are baking and cooling, your attention turns to the crowning glory: the coconut buttercream. This isn't just any frosting; it’s a vital component in achieving that perfect balance of sweetness and authentic coconut flavor.
The Magic of Coconut Milk
As mentioned, the secret to this buttercream's exquisite flavor is the use of coconut milk. Full-fat canned coconut milk, not the beverage kind, will provide the richest flavor and creamiest texture. It imparts a natural, delicate sweetness and a silky mouthfeel that complements the cake layers beautifully, ensuring the frosting is luscious without being cloyingly sweet.
Achieving the Perfect Consistency
The buttercream should be smooth, spreadable, and sturdy enough to hold the cake layers together. After creaming butter, powdered sugar, and a splash of coconut milk, you'll whip it until it's light and fluffy. Adjusting the consistency with a little more coconut milk or powdered sugar will help you achieve that ideal texture for both filling and covering your cake. To truly master the art of impressive frosting and cake assembly, consider exploring tips from
Mastering the Showstopping Coconut Layer Cake: Fluffy Perfection. Once frosted, a generous dusting of unsweetened shredded coconut on the sides and top transforms the cake into a stunning "snowstorm" worthy of any celebration.
From Holiday Table to Everyday Delight: Embracing Versatility
Auntie's Cherished Coconut Cake may have begun as a Christmas tradition, but its undeniable charm and deliciousness make it a perfect fit for any occasion. Its elegant appearance and universally loved flavor profile mean it can effortlessly transition from a festive holiday centerpiece to a vibrant Easter dessert, a showstopping birthday cake, or even a comforting treat for a Sunday gathering.
Imagine serving slices alongside a steaming cup of coffee or a delicate herbal tea. The cake's moistness means it holds up wonderfully, making it an excellent choice for potlucks or backyard barbecues where a showpiece dessert is desired. Its "not too sweet" characteristic also makes it a fantastic accompaniment to fresh berries or a light fruit compote, adding another layer of freshness.
To store, cover the cake loosely or place it in an airtight cake carrier at room temperature for up to two days, or refrigerate for up to five days. Bringing it to room temperature before serving will allow its flavors and textures to fully bloom.
In a world filled with fleeting trends, some recipes stand the test of time, becoming beloved traditions that connect us to our past and create new memories for the future. Auntie's Cherished Coconut Cake is one such recipe. It's more than just a dessert; it's a labor of love, a testament to thoughtful baking, and a guaranteed crowd-pleaser that embodies warmth, tradition, and the simple joy of sharing something truly delicious. So, gather your ingredients, follow these steps with care, and prepare to create your own cherished legacy with this magnificent
coconut layer cake.